In most cases, the issue isn’t your digitizing file — it’s the hat profile. A crown that’s too tall or too shallow can change the stitch angle, reduce stability, and cause your logo to warp once production moves from a single sample to hundreds or thousands of pieces.
Crown height controls the embroidery “working zone.”
It affects how much vertical space you have, how curved the front panel is, and how the cap sits under the embroidery head. When the crown height doesn’t match your logo size and placement, you’ll see common production problems like puckering, distortion, and even needle breaks — especially on structured caps.
After years of working with embroidery shops and production teams on the factory floor, I’ve seen the same pattern again and again: the wrong crown height turns a clean logo into a problem order.
In this guide, I’ll break down what crown height really changes, and how to choose the right profile for consistent, retail-ready embroidery results.
How Crown Height and Cap Structure Affect Stitch Quality
What’s the Real Difference Between Mid-Profile vs. High-Profile Caps?
If your logo looks “squashed,” tilted, or partially cut off on a finished hat, the issue is often not your embroidery file — it’s the crown profile you chose.
In bulk production, the wrong crown height creates expensive problems:
- The logo placement becomes inconsistent from cap to cap
- Stitches shift because the front panel curves too early
- Designs that looked fine on a sample start distorting in production
- Your final inventory becomes harder to sell (and harder to rework)
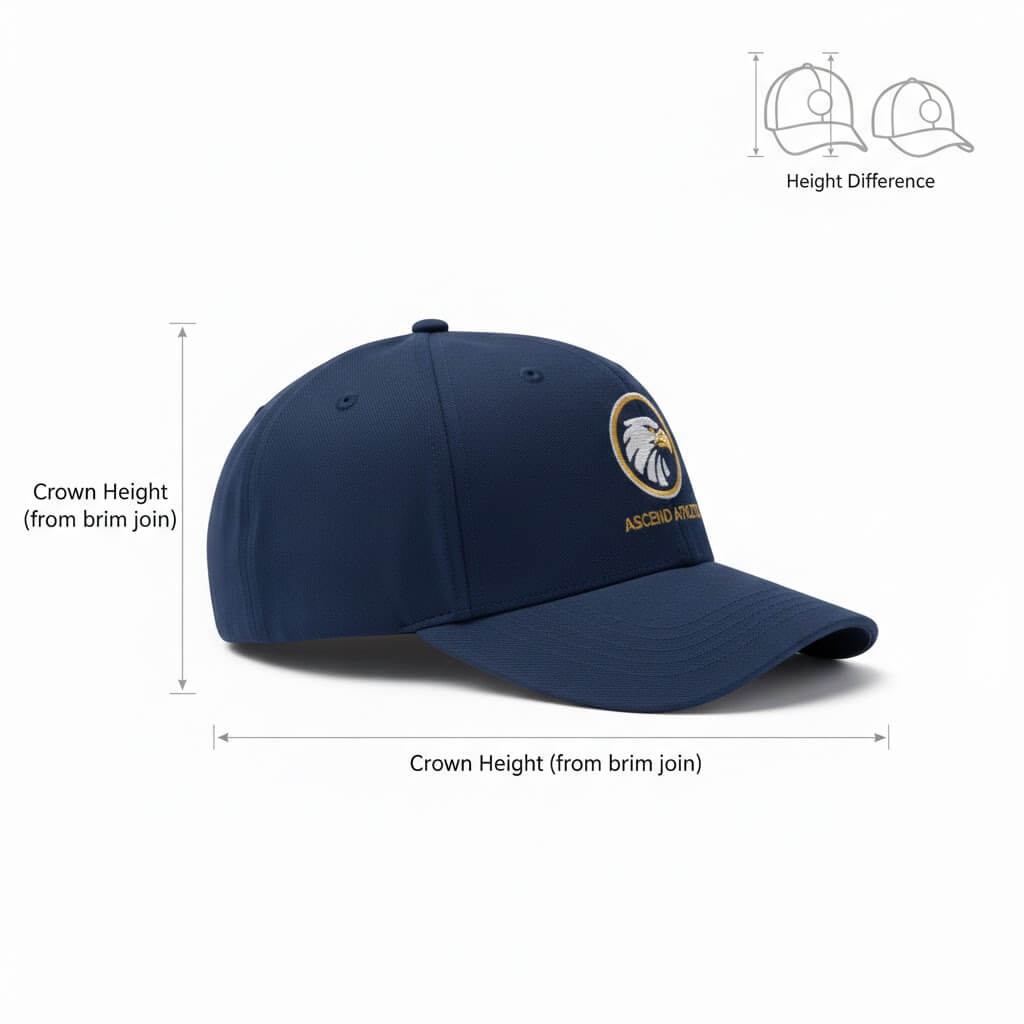
Crown Height Basics (In Plain Terms)
Crown height is the vertical distance from the brim to the top of the cap.
- High-profile caps (typically 3–4+ inches) give you a taller, flatter front panel — ideal for larger logos and clean alignment.
- Mid-profile caps (typically 2.5–3 inches) sit closer to the head and start curving sooner, which reduces usable embroidery space.
- Low-profile caps (typically 2–2.5 inches) curve the fastest and offer the least stable embroidery surface.
Important note: crown height ranges vary by factory and style. Always confirm measurements before sampling.
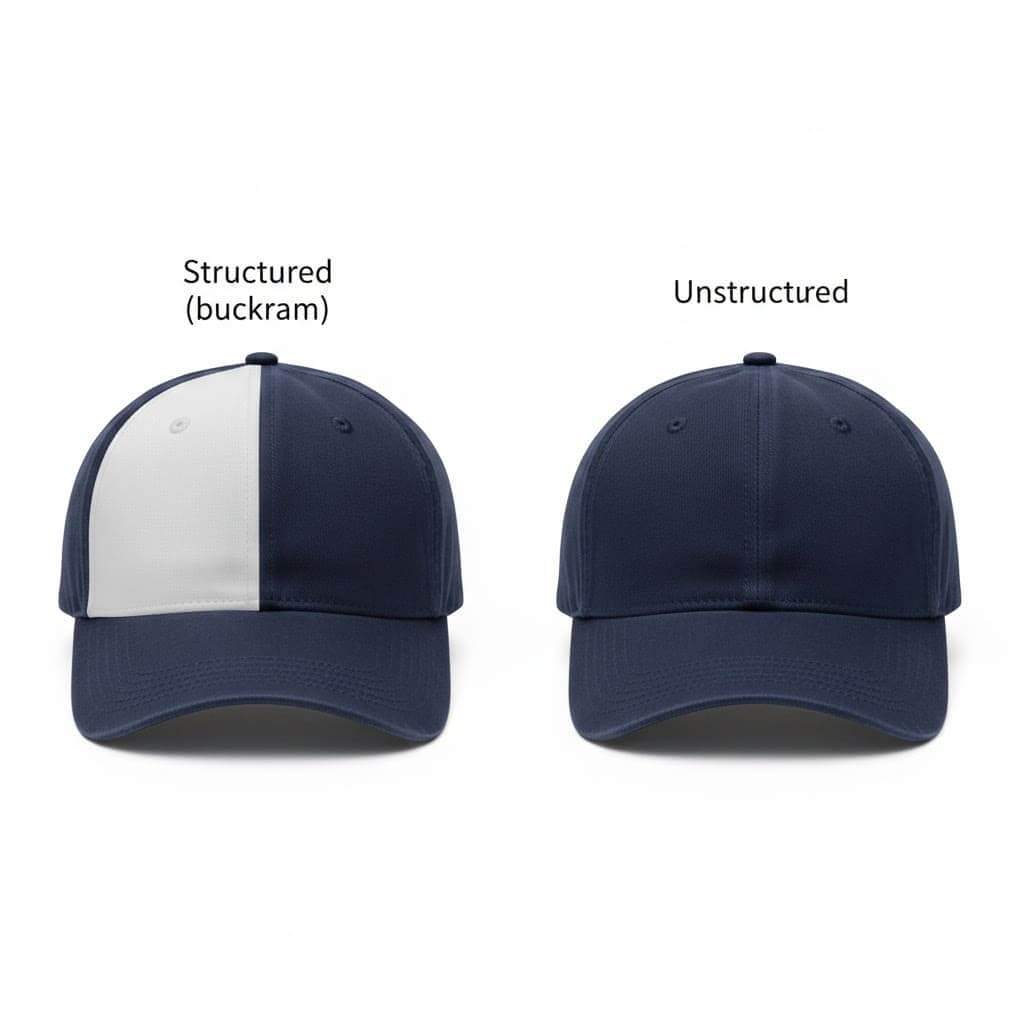
Cap Structure 101: Structured vs. Unstructured Front Panels
Before you worry about crown height, look at the cap structure — because it determines how stable the front panel stays under the embroidery head.
The crown isn’t “just fabric.”
For embroidery, it’s the foundation that holds your logo in place.
Structured Caps (Most High-Profile Styles)
A structured cap has a stiff support layer behind the front panels (usually buckram or a similar reinforcement).
This support works like a canvas:
- Keeps the fabric taut
- Prevents shifting during high-speed stitching
- Helps maintain clean edges on satin stitches
- Reduces distortion on larger or dense designs
Structured caps are usually the safest option for bulk embroidery because they hold their shape consistently.
Unstructured Caps (Common in Low/Mid-Profile Styles)
Unstructured caps do not have that built-in support.
That means:
- The fabric can collapse or wrinkle during stitching
- The hoop tension becomes harder to control
- Small variations in stitching pressure cause visible distortion
- Your logo is more likely to look “soft” or uneven
Unstructured styles can still be embroidered beautifully — but they require more careful design sizing, placement, and stitch planning.
Quick Reference: Low vs. Mid vs. High Profile Caps
| Feature | Low-Profile | Mid-Profile | High-Profile |
|---|---|---|---|
| Average Crown Height | 2–2.5 in | 2.5–3 in | 3–4+ in |
| Typical Look | “Dad hat”, athletic | Casual, corporate | Streetwear, trucker |
| Embroidery Space | Very limited | Moderate | Maximum |
| Stability | Low (often unstructured) | Medium | High (often structured) |
| Distortion Risk | High | Medium | Low |
Why Stability Matters More Than Style in Bulk Orders
If you’re ordering for a retail brand, you might love the relaxed look of a low-profile “dad hat.”
But from a production standpoint, high-profile structured caps are the safest option — especially for bulk orders.
Here’s why:
- A high-profile cap gives you a flatter embroidery plane
- A mid-profile cap curves sooner, which increases stitch angle issues
- As the hoop moves, the needle may strike the surface at a tilt
- This leads to uneven stitches, fraying thread, or distortion around edges
And when you order 5,000 pieces, even a small error rate becomes expensive.
A practical rule:
If your logo height is over 2.25 inches, a high-profile crown is usually the better choice — especially for front-center embroidery.
If you’re unsure, the best approach is to confirm crown height and structure before sampling, and match the profile to your logo dimensions.
How Hoop Physics Affects Embroidery Quality in Bulk Production
Why the Wrong Cap Frame Causes Flagging and Birdnesting
If you’ve ever seen thread nests, skipped stitches, or messy embroidery on caps, the root cause is often not the design file — it’s how the hat sits on the cap frame.
When the hoop (cap driver) doesn’t match the crown height and structure, the fabric can lift and bounce while stitching. This is called flagging, and it’s one of the fastest ways to create birdnesting (thread tangles under the stitches).
In bulk production, flagging isn’t just a “quality issue.” It becomes a business problem:
Longer lead times and higher unit cost
More machine stops
Slower output per hour
Higher rework and scrap rates
Flat Art vs. 3D Hats: Where the Problem Starts
Your logo is created on a flat screen — but hats are 3D objects.
A cap is stitched on a curved surface stretched over a metal cylinder. As crown height changes, the distance between the fabric and the needle plate changes too. That distance matters.
If there’s even a small gap — sometimes less than a millimeter — the fabric can vibrate every time the needle strikes.
That vibration is flagging, and it shows up immediately in the details:
- Small text becomes fuzzy
- Satin edges lose sharpness
- Fine outlines look shaky or uneven
Managing Tension Consistency in High-Volume Runs
For high-volume orders, consistency is everything. The goal is to keep the front panel stable from the first cap to the 10,000th cap.
Different crown heights require different hooping setups:
- High-profile structured caps often need a heavier-duty cap driver and stronger tension control to keep the front panel pulled down correctly.
- Mid-profile caps may require additional stabilizer support to reduce vibration and keep the panel from collapsing under stitch pressure.
In production, stabilizers aren’t just “extra backing.” They’re a structural tool that helps the fabric behave predictably under the needle.
Without the right hoop + stabilizer combination, you’ll see:
- tension changes as the needle moves up the curve
- thread breaks that stop the line
- registration drift (the logo slowly shifts off alignment)
Curvature and Stitch Density: Why Profile Changes What’s Possible
Crown profile also affects how much stitch density a cap can handle.
A taller, flatter front panel gives the embroidery more usable area and more stable support. This allows:
- cleaner fill stitches
- sharper edges
- higher density without puckering
On mid-profile or low-profile caps, the curve starts sooner. The fabric is being pulled in multiple directions at once, which increases the risk of:
- puckering
- distortion
- uneven coverage on solid fills
If your logo includes large fill areas, heavy stitch density, or fine text, a high-profile structured cap is usually the safer choice for bulk production.
Why “One-Size-Fits-All” Digitizing Fails on Caps
Using one embroidery file across different cap profiles is one of the fastest ways to ruin consistency in bulk production.
A file that stitches cleanly on a high-profile cap can distort on a mid- or low-profile crown — not because the logo is wrong, but because the curve, tension, and stitch angle are different.
In some cases, a design placed for a high crown will sit too high on a mid-profile cap, increasing the risk of hitting seams, reaching hoop limits, or causing needle strikes near the bill.
The “Sweet Spot” Changes by Crown Height
Every cap has a zone where embroidery looks sharpest and runs most reliably.
- High-profile structured caps offer a larger, flatter sweet spot.
- Mid-profile caps have a lower sweet spot because the curve starts sooner.
If a digitizing file assumes a high-profile placement, the machine may run into physical limits as it stitches upward. That’s when you see:
- the frame “bump”
- the logo shift slightly
- edges lose alignment
For bulk orders, that shift is the difference between “retail-ready” and “reject pile.”
A Real Risk on High Crowns: The Forehead Fold
High crowns have a hidden issue: excess fabric can fold near the top of the front panel if hooping tension isn’t perfect.
If the needle catches that fold, the cap is ruined.
That’s why high-profile digitizing often benefits from center-out stitching, which pushes fabric outward instead of trapping it in the middle.
Quick Guide: How Digitizing Must Adapt
| Design Factor | High-Profile Caps | Mid/Low-Profile Caps |
|---|---|---|
| Safe logo height | 2.5–3 in | 2.0–2.25 in |
| Stitch strategy | Center-out or bottom-up | Bottom-up (preferred) |
| Small text | More flexible | Best kept low |
| 3D puff | Usually works well | Use with caution |
Consistency Across Styles Requires File Adjustments
If your brand runs multiple cap styles, you should not rely on a single “universal” embroidery file.
A logo that looks sharp on a tall trucker can look fat or squashed on a low-profile dad hat.
In production, we adjust technical settings like pull compensation based on crown height and structure — so your logo stays consistent across different profiles, not just on one sample.
How Embroidery Machines Are Calibrated for Different Crown Heights
Why Calibration Matters (And What Goes Wrong Without It)
Crown height isn’t just a style choice — it changes how a cap physically sits on the machine.
If the machine isn’t adjusted for the crown height, you can run into:
- scuffing (shiny rub marks on the front panel)
- premature mechanical wear
- increased risk of oil contact or stains
- inconsistent stitch quality across the run
In bulk production, these issues don’t show up as “one bad cap.” They show up as a repeatable defect across hundreds of pieces.
Presser Foot Clearance: The #1 Cause of Scuffing
High-profile caps sit higher above the machine arm. If the presser foot height is set for a lower crown, it will repeatedly tap or rub the cap as the machine stitches.
That contact creates the “shiny spot” buyers hate — especially on cotton twill, brushed fabrics, and certain poly blends.
In professional production, presser foot height is adjusted by SKU so the needle can move cleanly without unnecessary contact.
Cap Driver Depth: Keeping the Needle-to-Fabric Distance Consistent
The cap driver is the part of the machine that holds and rotates the cap frame.
On higher crowns, the driver often needs to be set deeper or further back to allow the needle to reach the lower embroidery zone near the bill — without striking the metal frame.
If cap driver depth is off, one common symptom is:
- the top of the logo looks clean
- but the bottom looks fuzzy or unstable
That usually happens because the fabric-to-needle distance is changing during the stitch cycle.
Avoiding Mechanical Interference on High Crowns
High-profile caps can also create clearance issues with sensors and moving parts.
If the crown hits the machine head, it can trigger an emergency stop — or worse, damage the cap during stitching.toggle.
This is one reason structured crowns are more production-friendly:
they hold their shape predictably, while unstructured high crowns can flop and interfere with the machine path.
For bulk runs, shops often use controlled compression methods (clips, adjusted wing nuts, and proper frame tension) to keep the crown stable — without permanently deforming the cap.
Practical Takeaway for Bulk Buyers
If you’re ordering the same logo across multiple profiles (high, mid, low), expect the setup and calibration to change — even if the design stays the same.
That’s how professional embroidery maintains consistent quality across thousands of units.
Conclusion
Crown height is one of the most overlooked variables in cap embroidery — and one of the most expensive to get wrong in bulk production.
Once you understand how crown height affects hoop stability, digitizing, and machine calibration, you can prevent distortion, reduce scrap, and deliver cleaner, more consistent branding across every style.
FAQ
1) Is high-profile always better for embroidery?
Not always — but it’s usually the safer choice for bulk production. High-profile structured caps offer a larger, flatter embroidery zone and better stability, especially for detailed logos or larger designs.
2) What logo size typically requires a high-profile crown?
As a practical rule, if your front logo height is over 2.25 inches, a high-profile crown is often the better option to avoid distortion, seam interference, or hoop limitations.
3) Can mid-profile caps still produce clean embroidery?
Yes. Mid-profile caps can stitch beautifully, but the usable “sweet spot” is lower and the curve starts sooner. Clean results depend heavily on correct placement, stabilizer choice, and profile-specific digitizing.
4) Why can’t I use the same embroidery file across different cap profiles?
Because crown height changes the curve, tension, and stitch angle. A file optimized for a high-profile cap may look squashed or unstable on a mid/low-profile crown unless pull compensation and stitch strategy are adjusted.
5) What causes flagging and birdnesting on caps?
The most common cause is poor hoop-to-crown fit. If the cap doesn’t sit firmly against the needle plate, the fabric can vibrate during stitching (flagging), which increases the risk of thread nests (birdnesting) and blurry details.
6) What’s the difference between structured vs. unstructured caps for embroidery?
Structured caps have a reinforced front panel (often buckram), which keeps the embroidery surface stable. Unstructured caps are softer and more prone to shifting, puckering, or distortion — especially with dense fills or small text.
7) What should I provide before sampling to avoid production issues?
To recommend the safest crown profile, provide:
- your logo size (width × height)
- placement location (front center / side / back)
- embroidery type (flat, 3D puff, patch, etc.)
- target cap style (trucker, snapback, dad hat, etc.)